Anterior Pelvic Tilt Exercises With a 4-Week Re-Check Plan
Five anterior pelvic tilt exercises in a 10-minute mat routine, plus three simple ways to measure your pelvis before you start and re-check it every four weeks with the same side photo.
Short answer: Most anterior pelvic tilt exercises do three jobs: find neutral, wake up the core and glutes, and stretch the front of the hip and thigh. The routine below covers all three with five moves in about 10 minutes, three times a week. What most exercise lists leave out is the measuring: take one side photo before you start and the same photo four weeks later, so you compare something real instead of guessing from a mirror.
Hi, I'm an editor on the Bodycheck Care team. If you search for anterior pelvic tilt exercises, you'll find plenty of lists of moves. Very few of them tell you how to check whether anything changed after a month of doing them.
This guide does both. First, a quick way to record where your pelvis sits today. Then a 10-minute routine you can do on one mat. Finally, how to re-check in four weeks without fooling yourself with a different camera angle.
What is anterior pelvic tilt, and do you need exercises for it?
Anterior pelvic tilt is an everyday description of a standing pattern where the pelvis tips forward. From the side, the lower-back curve looks deeper and the bottom sticks out a little behind, while the hips stay roughly over the ankles.
A few things are worth knowing before you start:
- It is a description of posture, not a diagnosis. A small forward tilt is common, and plenty of people stand this way with no discomfort at all.
- It changes during the day. Tiredness, shoes and how long you've been sitting all shift how you stand.
- It is often mixed up with swayback. If your hips sit clearly in front of your ankles, read swayback vs anterior pelvic tilt first, because the exercises lean a little differently.
You don't need exercises because of a photo. But if your pelvis tips forward and you'd like to practice a different position, a short routine plus a way to measure it is a reasonable place to start.
How do you measure anterior pelvic tilt before you start?
Pick at least one of these and do it before your first session. Write down the date.
| Method | What you need | What it shows | How easy to repeat fairly |
|---|---|---|---|
| Wall gap | A wall and your hand | Roughly how big the gap behind your lower back is | Low: depends a lot on how you stand that moment |
| Side photo + ankle line | Phone, fitted clothes | Where your hip sits against your ankle and how deep the lower-back curve looks | Medium, if the setup stays the same |
| Hip-bone stickers + side photo | Two small stickers, phone | The line between the front and back of your pelvis | Medium: finding the same bony points takes a little practice |
| Bodycheck Care app | Phone, a front and a side photo | Pelvic tilt front to back as an angle, plus a posture score | Higher: the same calculation every time |
1. Wall gap (30 seconds)
Stand with your heels about a hand-width from a wall and let your body settle as usual. Slide a hand behind your lower back. Note whether it slides in easily with room to spare or only just fits. It's a rough check, but it costs nothing.
2. Side photo with an ankle line
- Phone at waist height, about 2 to 3 meters away, timer on or someone helping.
- Turn side-on and stand the way you usually stand, not your best posture.
- Fitted clothes, so the hip, knee and ankle are visible.
- Open the photo, draw a straight line up from just in front of your ankle bone, and look at where the hip and the lower-back curve sit.
3. Two stickers on the hip bones
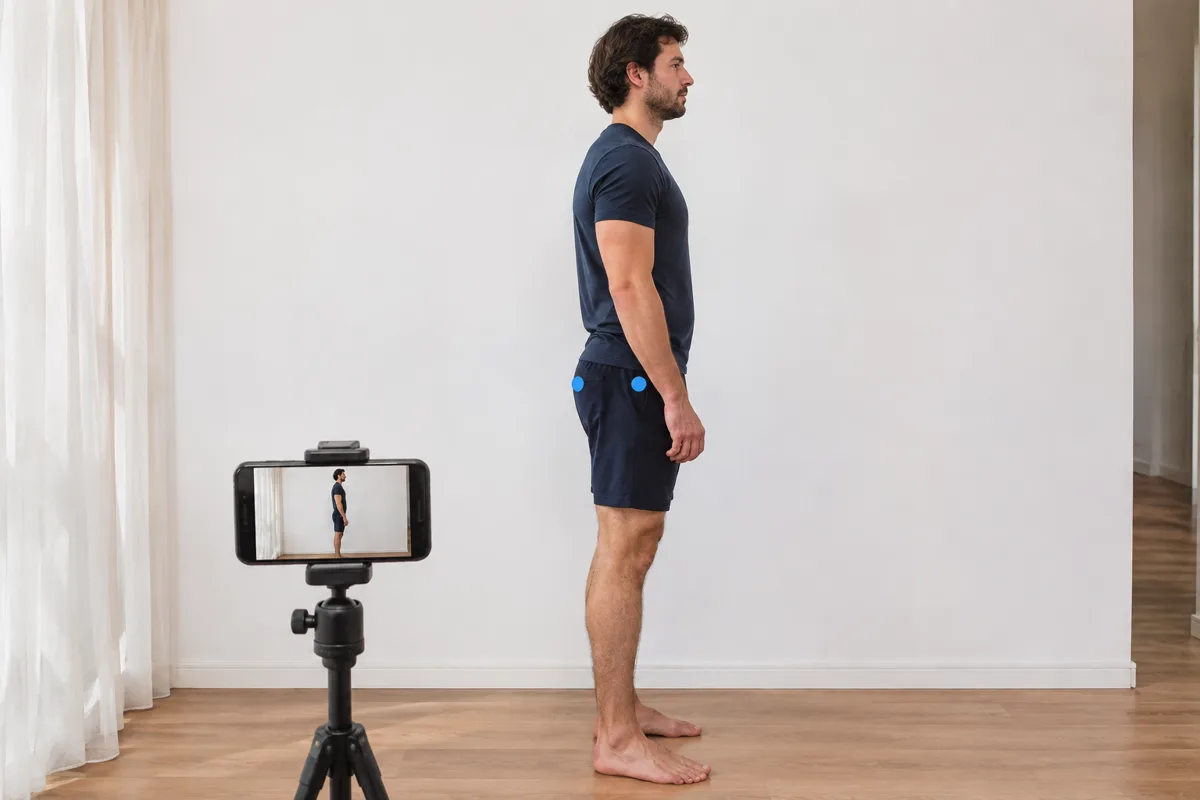
This is the step that makes a side photo more useful for the pelvis specifically.
- Find the bony point at the front of your hip (feel along the top of the pelvis toward the front until you hit the bump). Put a small sticker there.
- Find one of the two dimples at the back of your pelvis, just above the bottom, on the same side. Put a second sticker there. A helper makes this easier.
- Take the side photo as above and draw a line between the two stickers.
Don't compare your line with anyone else's. Bodies differ, and there's no single right angle to aim for. The point is to compare you today with you in four weeks.
4. As a number in the app
In Bodycheck Care you take a front and a side full-body photo. From the side photo the app shows how your pelvis tilts front to back as an angle, along with head, shoulder and knee angles and a posture score. It does not measure range of motion or mobility, and it is not a medical device. The formulas are on how we measure. If you'd rather stay in the browser, the free posture test reads a side photo without uploading it.
For more home checks, including uneven hips, see the anterior pelvic tilt self-check and the posture test at home.
The 10-minute anterior pelvic tilt routine
The order is simple: find neutral, wake up the core and glutes, then stretch the front of the hip and thigh. Each move takes about two minutes. Try it three times a week on alternate days for four weeks, then re-check. If you'd like something that builds up more gradually, the 4-week hip and pelvis program adds moves week by week.
1. Lying pelvic tilt · 2 sets × 10 reps
- Lie on your back with knees bent and feet flat, hip-width apart.
- Breathe out and gently flatten your lower back into the mat by tipping your pelvis back.
- Breathe in and let it return to a small natural curve.
- Keep it slow and small. This teaches you what tipping the pelvis back feels like, which the next moves build on.
2. Dead bug · 2 sets × 8 reps · each side
- On your back, lift your knees above your hips with shins level and arms toward the ceiling.
- Keep your lower back quiet on the mat, as you practiced in move 1.
- Slowly lower one arm overhead and the opposite leg toward the floor, only as far as your back stays still.
- Return and switch sides. If your back lifts, make the movement smaller.
3. Glute bridge · 2 sets × 12 reps
- Lie with knees bent and feet hip-width apart.
- Tip your pelvis back slightly first, then push through your heels to lift your hips.
- Stop when your body makes a line from shoulders to knees. Squeeze your glutes for one second. Don't arch your lower back to get higher.
- Lower slowly, one section of the back at a time.
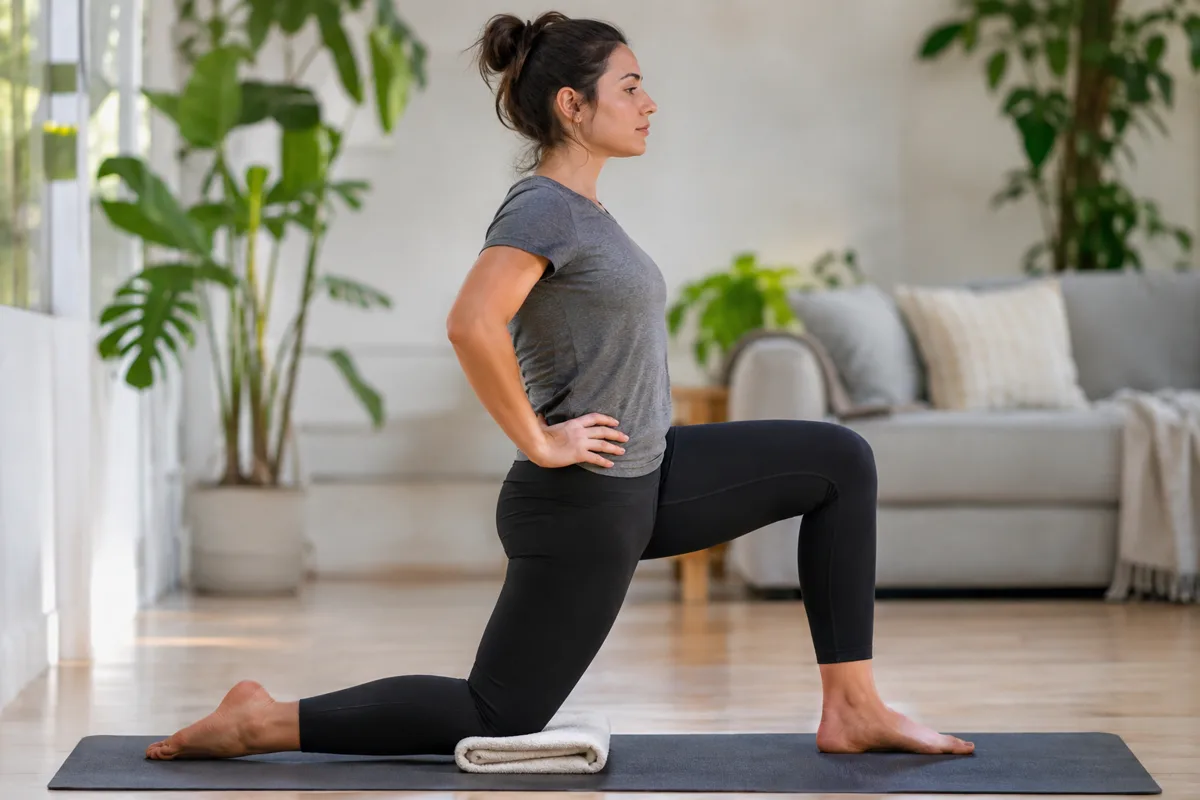
4. Half-kneeling hip flexor stretch · 2 × 30 s · each side
- Kneel on one knee on a folded towel, with the other foot flat in front of you.
- Tuck your tailbone slightly, as if tipping the pelvis back.
- Squeeze the glute of the kneeling leg. You should feel a gentle stretch at the front of that hip without leaning forward.
- Hold 30 seconds, breathing slowly, then switch sides.
5. Side-lying quad stretch · 2 × 30 s · each side
- Lie on your side with your head resting on your lower arm.
- Bend your top knee and hold your ankle or the hem of your trousers.
- Bring the knee slightly back so it lines up with your hip, without arching your lower back.
- Hold 30 seconds at a gentle stretch, then roll over and switch.
At a glance
| # | Move | Sets | Job |
|---|---|---|---|
| 1 | Lying pelvic tilt | 2 × 10 reps | Find neutral |
| 2 | Dead bug | 2 × 8 reps · each side | Core |
| 3 | Glute bridge | 2 × 12 reps | Glutes |
| 4 | Half-kneeling hip flexor stretch | 2 × 30 s · each side | Front of the hip |
| 5 | Side-lying quad stretch | 2 × 30 s · each side | Front of the thigh |
Moves can be hard to follow from text alone. In Bodycheck Care every move has a video, and the app counts the time and sets for you.
How do you re-check after 4 weeks?
Repeat exactly what you did on day one. The setup matters more than people expect.
- Same spot and light, so shadows don't change what you see.
- Same clothes, ideally the same stickers in the same places.
- Same phone height and distance. A phone held lower or closer changes how the pelvis looks.
- Same time of day. Posture after a long day often looks different from posture in the morning.
- Stand as usual. If you stand your best on the second photo but not the first, you're comparing effort, not posture.
Then put the two photos side by side. What if nothing seems different? That can happen after four weeks and doesn't mean you did anything wrong. Posture shifts slowly, and a small difference can disappear inside normal day-to-day variation. Keep the routine going and check again in another four weeks. Over several check-ins, the direction is more useful than any single photo.
When to see a healthcare professional
These exercises are general movement practice, not a plan for pain. See a doctor or another healthcare professional before continuing, or before starting at all, if you notice:
- Back or hip pain that does not settle with rest or keeps coming back
- Pain that spreads down a leg
- Numbness, tingling or weakness in a leg or foot
- Pain that started after a fall or an injury
- Back pain together with fever or weight loss you can't explain
A posture photo can't tell you why something hurts. If you have any of these signs, get it checked first.
Frequently asked questions
What are the best anterior pelvic tilt exercises? There is no single best move. Most routines combine finding neutral (lying pelvic tilt), core and glute work (dead bug, glute bridge) and stretches for the front of the hip and thigh. A short routine you repeat three times a week matters more than a long list.
How do I measure anterior pelvic tilt at home? Take one side photo with your phone at waist height, in fitted clothes, standing as usual. Two small stickers on the front and back bony points of the pelvis make the line easier to see. Repeat with the same setup every four weeks. It is a rough self-check, not a diagnosis.
Can exercises change anterior pelvic tilt? There is no guaranteed result and no set timeline. Many people stand with a small forward tilt and have no discomfort. Exercises may help you notice and practice a different position, and the same side photo every four weeks shows whether anything changed.
How long until I see a difference? It differs from person to person, and we can't give you a timeline. Four weeks is a practical point to re-check, not a promise of a result.
Is there an app that measures pelvic tilt? Bodycheck Care takes a front and a side photo and shows how your pelvis tilts front to back as an angle, with head, shoulder and knee angles and a posture score. It does not measure range of motion or mobility, it is not a medical device, and it is free on iPhone and Android.
Before you start
- Move within a comfortable range. A stretch should feel gentle, never sharp. Stop any move that causes pain.
- Breathe throughout. Breathe out on the effort, and don't hold your breath in the bridge or the dead bug.
- Start with one set of each move if two feels like a lot, and add the second set later.
- Ask first if you are pregnant or recently gave birth, have had back or hip surgery, or are recovering from an injury.
- Take your before photo on day one, so you have something to compare in four weeks.
Bodycheck Care · Free
See your pelvic tilt as an angle from two photos
Take a front and a side photo to see how far your head and shoulders sit forward as a score, then follow moves picked for your result, each with a video.
References
- NHS: Back pain, including exercise advice and when to get medical help
- Bodycheck Care: how we measure